The Go cobra framework is a great tool that can be used to write command-line interfaces in golang. It is used by many different organisations and projects because of how easy and simple it is to use.
Link to the Cobra framework: https://cobra.dev/. Cobra framework documentation: https://pkg.go.dev/github.com/spf13/cobra
Using it is simple. Run the following (in your terminal):
go get -u github.com/spf13/cobra/cobra
in your terminal. This'll install the cobra library and all the associated dependencies. The -u flag will make sure that the dependencies are taken care of.
In your go code, you'll need to import the library by adding in:
import "github.com/spf13/cobra"
Throughout this blog, I'll be walking you through the basics of working with the cobra framework to build a CLI tool that generates deployment files based on the image name, docker image and other options.
Context regarding the Kubernetes deployment file and its various fields is beneficial to have.
Setting up the basics
This here is the GitHub repo link if you intend to follow along: https://github.com/abs007/kubewrite
The go cobra framework comes with the library itself and also the cobra generator. The generator can be used for setting up all the required basic files. Setting up your project this way also helps ensure a proper structure. We'll be using the generator for this blog. Link for the generator: https://github.com/spf13/cobra#usage
Let's first download the generator (in your terminal):
go install github.com/spf13/cobra-cli@latest
Now run the command: cobra-cli to see all the flags and sub-commands that you can use.

If it shows that the command can't be found, then you should consider adding the location to your GOBIN location (~/go/bin) to the $PATH variable. More info here: https://phoenixnap.com/kb/linux-add-to-path
Let's set up the directory and the project structure now (in your terminal)
mkdir kubewrite
cd kubewrite
go mod init kubewrite
cobra-cli init kubewrite
What go mod init is initialize/create a new module file for keeping track of dependencies and cobra-cli init kubewrite initializes a new cobra-cli project structure.
You'll be getting a structure like this:
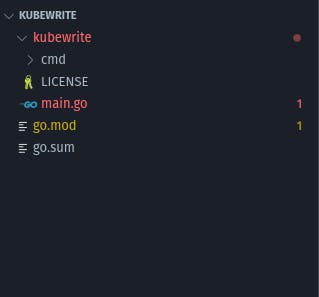
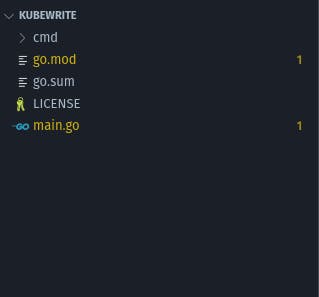
The cobra-cli command creates a separate folder (the second "kubewrite" folder in this case) which I think is unintuitive. Let's move the contents of the inner kubewrite up the hierarchy to get this:
You'll notice that the main.go file has some boilerplate. Let's keep it that way. This file will be used as an entry point. We'll instead be writing the main functionality in the root.go, inside the cmd folder.
Working with root.go
Before we start, let's first define the proper import statements. You'll understand the purpose of each imported package as I go through the explanation.
import (
"os"
"text/template"
"github.com/spf13/cobra"
)
Inside the root.go file, you'd be finding a variable, function and method. The variable is rootCmd. What this does is create a pointer to the cobra.Command struct. The struct has different fields for the user to fill up according to their needs. Hover over each to read the comments and understand that particular field. You'll understand that Use is to show how the user would be using the command and Short and Long are for providing descriptions. Let's remove the Long field since Short will be enough for our use case. Let's remove the rootCmd variable for now. We'll add it later to our own function.
This root command (rootCmd) is the first command in a CLI structure to which we add further sub-commands. The way to do that via the generator would be to use the cobra-cli add <command_name> command.
Next, in the root file, you'll find the init() function. This function exists for adding flags to our command. Let's remove that. I'll explain why later.
Now, let's declare a deployment constant. This'll exist for us as a base deployment template whose fields we'll be changing based on the user inputs. For the moment, let's support four fields: Name, Replicas, Image and Port.
const deploymentTemplate string = `apiVersion: apps/v1
kind: Deployment
metadata:
name: {{.Name}}
spec:
replicas: {{.Replicas}}
selector:
matchLabels:
app: {{.Name}}
template:
metadata:
labels:
app: {{.Name}}
spec:
containers:
- name: {{.Name}}
image: {{.Image}}
ports:
- containerPort: {{.Port}}
`
Let's also define a Deployment struct so that we have all those four fields defined at a central location:
type Deployment struct {
Name string
Replicas int32
Image string
Port int32
}
Let's create a new function: kubewrite() *cobra.Command {} which returns a pointer to the cobra.Command struct. If you guessed right, yes we'll be defining the rootCmd variable inside this function and returning and also the flags (for which we removed the init() func).
func kubewrite() *cobra.Command {
var name, image string
var replicas, port int
rootCmd := &cobra.Command{
Use: "kubewrite [flags]",
Short: "A command-line tool for generating Kubernetes deployment YAML",
RunE: func(cmd *cobra.Command, args []string) error {
deployment := Deployment{
Name: name,
Replicas: replicas,
Image: image,
Port: port,
}
t := template.Must(template.New("deployment").Parse(deploymentTemplate))
err := t.Execute(os.Stdout, deployment)
if err != nil {
return err
}
return nil
},
}
//Lower half of the func is below
This does seem like a lot. Let's walk through it, step-by-step:
- The first 2 lines create variables that would be storing the user input
- Next, we create the rootCmd variable. The RunE field (after the Short) exists to write the logic for the function that would run whenever a user would run the command. The E is there to return an error, if any
- Then, we create a deployment variable of type Deployment and pass in the user-defined values into the variable
- Next, we'll be using the template.Must() function from the template package. The func accepts a template string and returns a template object. We give the name of the template in template.New("deployment") and then parse the deploymentTemplate constant
- The t.Execute() method then writes the output to the terminal and takes in the deployment variable as the data to feed into the template object t.
The function isn't finished yet. I broke down the lower half of the func to help in readability. Here is the remaining part:
// Lower half
rootCmd.Flags().StringVarP(&name, "name", "n", "", "The name of the deployment")
rootCmd.MarkFlagRequired("name")
rootCmd.Flags().StringVarP(&image, "image", "i", "", "The Docker image to deploy")
rootCmd.MarkFlagRequired("image")
rootCmd.Flags().IntVarP(&replicas, "replicas", "r", 1, "The number of replicas to deploy")
rootCmd.Flags().IntVarP(&port, "port", "p", 80, "The port the container should listen on")
return rootCmd
}
- What this part does is add the flags. Flags are additional arguments that you'd pass along while executing the command. Let's look at the first one. We use the StringVarP() method to define a flag of type string. The P exists to allow for a shorthand replacement. In your IDE, if you hover over the method, you'll be able to see the different arguments it accepts and then relate to the ones being passed here. Similarly, we create the other flags.
- You'll notice the MarkFlagRequired() method. This does pretty much what the name suggests. This makes it important for you to provide the value for this flag.
- Finally, we return the rootCmd pointer too.
There's a last function that hasn't been discussed yet. Its the Execute() func. This function gets called by the main.go file in the root directory and its purpose is to execute the command and exit (using the os package) when the job's done. Execution here means running the command so that it can do its job and take in user parameters.
All of this creates the core logic for the kubewrite command.
Running the command
Let's run and check if the command is working. Before we do that, let's just run this command from the root dir in the terminal to take care of the imports and checksums (in your terminal):
go mod tidy
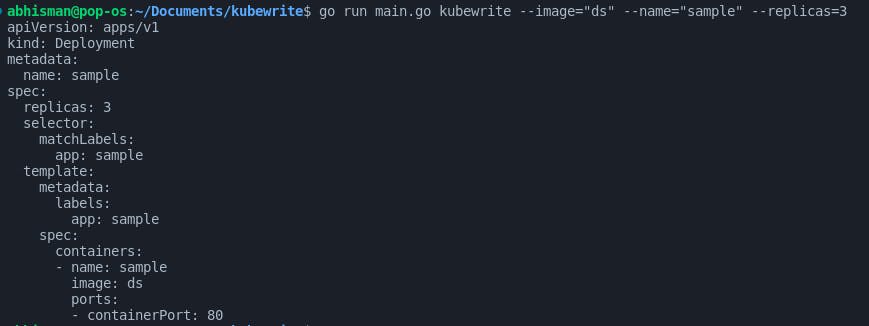
Next, let's run the actual command via the main.go file. I'll pass in "nginx:1.14.2" as the image name, "sample" as the name of the deployment and 3 replicas (in your terminal).
go run main.go kubewrite --image="ds" --name="sample" --replicas=3
This should be the output:
If you got this far and understood it all, congrats and I'm glad I could be of help :)